Thursday, November 29, 2012

15mm Attalid Pergamene WIP 2

Almost done.


I'm missing two elements worth of figures.

They are frankly not very well-painted as I wanted to turn them out during my leave this week, and because I knew much of the painting would be obscured by the large shields anyway; when I look at the unit from the front all I get is an impression of large white shields, bronze helmets with red crests, and thin wire spear-shafts, so perhaps it's not so unrealistic after all.

Wednesday, November 28, 2012

Liebster Blog Award


I am sure you have seen that picture of the shiny man around during the past few weeks.

Well, Dan at merseybooks has chosen to tag me with the award (thanks, Dan!). Dan is the author of Dux Bellorum and Song of Arthur and Merlin, and is currently working on another set of rules for the medieval period - I think I will do a playtest post here soon. Dan is also a contributor on Battlegames magazine, and his ladder campaign in one of the earlier issues is one of my favourite campaign formats.

Now the rules of the meme requires me to tag "five favourite blogs with less than 200 followers", but all the blogs I regularly read have more followers than that, and many have already received the award!

Well, all good things must come to an end, and perhaps that is my part in this. Thanks once again, Dan.

Tuesday, November 27, 2012

15mm Attalid Pergamene WIP 1

I finally got the 15mm Xyston figures primed yesterday, and made good progress on them today.


On the left are two of the three bases of cavalry I need, on a movement tray I made myself.

In the centre are the command bases of the two units of thureophoroi I am planning to paint, again on a movement tray. The iconography on the two flags and the letters on them are taken from Pergamene coins, representing Athena's bow and Asklepios' snake respectively. On the right is the single unit of skirmisher.

That's about one third of the force done in an afternoon. I hope to complete the whole DBA-sized force this week.

Sunday, November 25, 2012

First Game of 40K 6th Edition

It's been a while since we managed to get a game in, but yesterday Thomas and I managed to play a small 1000 pts game of 40K.

The basic rules themselves are rather standard - we played without vehicles or artillery - but I suspect things are more complex once we add vehicles, artillery, and psychic powers,

What I found is that given the fast pace of the game, 40K is really rather unforgiving: if your troops are not shooting/assaulting, they are points you have wasted for that turn. Plasma weapons seem to be over-powered, which leads me to wonder if I should get more of them...

Anyway, here are a few pictures from the game.

The two sides face off along the length of the table.

Blood Angels charge into the the gun line.

My Assault Squad, led by the Chaplain, charge into close combat.

Monday, October 29, 2012

Project Graveyard - Final

Thanks to all the readers who left encouraging comments - I am glad to announce that Project Graveyard is complete.

Carrying on from the previous instalment...

The "frame" is sprayed black and then painted in medium grey and drybrushed in light grey. The fence sections are sprayed black, and then painted with a silver paint that leaves a gunmetal finish.

The "insert" is likewise sprayed black and then painted in brown, and highlighted with the same brown paint mixed with some grey paint.  I chose to flock it with Varied Dry Grass from Realistic Modeling instead of my usual green mix to give it that desolate feel.   
The scene is then completed with a crypt, a tree stump, tombstones, and some dried flowers from my potpourri jar (what? A man can't like nice scents?).


I had fun making this, and now fg, Thomas and I are thinking of collaborating on another project: Project Vampire Mansion. I will make an insert for the grounds of the mansion to be fitted inside the same fenced area, fg will build the Warhammer Chapel he has, and Thomas will rig some flickering LED lights for the interior. Stay tuned.

Crypt from Thomarillion
Tombstones and tree stump courtesy of Fantascene
Flock courtesy of Realistic Modeling Services

Sunday, October 28, 2012

Halloween Weekend Game: Zombicide

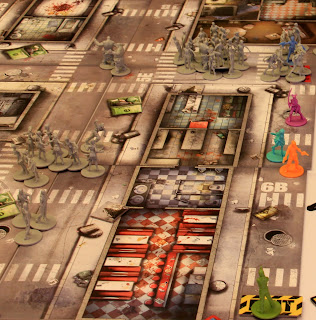
For the Halloween weekend game I suggested we play a themed game, and fg suggested Zombicide, which he got as their Kickstarter offer.

The rules were pretty simple, so we set the boards up and played the first scenario...

Game - check. Drinks and chips - check. Halloween decoration and candy - check.
We were not even one quarter through the objectives before our characters got surrounded by zombies and massacred.

The end for our unfortunate 'survivors'.
Despite a poor initial showing, we decided to replay the scenario, this time with more caution, taking care to spend some time searching for good equipment to make sure all the characters were properly armed, and that as far as possible characters did not level up before all the other characters were also close to levelling up (as the number of zombies raised is pegged to the level of the highest-level character in the game).

This time round we did better, managing to get to all the objectives before the numbers began to pile up and make it look hopeless... and then El Cholo (the Danny Trejo lookalike) sacrificed himself to allow the others to escape with the items required to win the scenario.

'Go! Get to the exit!' El Cholo lays his life down, that others may live.

We made it! Amazingly, Doug, the figure in blue, ultimately made it too.
We had a lot of fun. The game has a rather well-designed algorithm for zombie movement, which means no referee was needed. It is however very tactical, and running around without forward planning would mean a quick end (as we learnt in our first attempt).

The only thing I found lacking was a sense of urgency built into the game; however, this is something easily remedied by the employment of a clock, or the appropriate frame of mind.

I can see us playing this game again, which frankly is about as high a praise as you can give for a boardgame?

Wednesday, October 24, 2012

Project Graveyard WIP 3

I've combined two evening's work together since there wasn't much progress on account of waiting for the glue to dry.

A layer of masking tape is taped over the entire piece, leaving only the steps and dug grave exposed, and then a layer of white glue is spread over the entire surface.

My usual 'spice mix' of sand and gravel is poured over the insert. When dry, flagstones made from thin card is glued to the path.

The front gate section is removed to show the interior better.

I am still not sure what colour to paint the ground; my usual basing colour is too red and warm for what I am planning to convey here, so I am thinking either a black prime followed by a dark brown and then a drybrush of brown mixed with grey, or to go black and grey.

I won't be able to work on this tomorrow, but I will have all of Friday to prime and paint the pieces, and hopefully put the finishing touches on this project on Saturday.

Monday, October 22, 2012

Project Graveyard WIP 2

Having purchased some mounting board, I went on with phase 2 of the project: the bases.

I glued the rails/frame for the fences onto a mounting board and cut the base out, then sealed the edges with masking tape with disguise the various layers and the joints of the plastic strips.

For the actual cemetery ground itself I decided to make a separate removable board. This once again gives me some flexibility - I can easily model a new landscape if I didn't like my first attempt, or make new inserts for different terrain types.

Once I cut out an insert of the appropriate size, I sketched the basic layout with pencil - a flagstoned path leading to the crypt, with a central dirt track leading to the sides, dividing the interior into four plots.

I used foamcore to build up the height of each plot. In one plot I cut out an open grave. The sides of the foamcore plots are cut at a bevel, and the pieces glued to their assigned places. I didn't have to be very precise because I plan to use masking tape to smooth out the contours.

The baseboard, insert, and sketched layout. Note the open grave and cut for steps.

The parts assembled. A base is added to the crypt and steps added to the cut in the slope.
Now I must wait overnight for the glue to dry before going on the phase 3: terraining.

Sunday, October 21, 2012

Project Graveyard WIP 1

I've been sitting on the graveyard project for quite a while, but this afternoon I was suddenly seized with the Halloween spirit and decided to start work on it.

Now a big part of the delay was my indecision over what size to make the piece. After some discussion with fg, we decided to make it modular, usable with both the fence set I got, as well as the PMC walled compound piece.

After toying with a few ideas, I decided on mounting the fence sections on a sort of a rail system, made by the versatile plasticard and plastistrips I had lying around. This will allow me to take the fence down for storage, as well as substitute "ruined" sections of the side walls as required by the scenario.


I also made the decision to cut the fence down to a shorter length, which would make the base board of the piece smaller and thus less prone to warping. The resulting piece is just a little bigger than an A4 size, which is easy to store and use. In one corner you can see the crypt I bought from Thomarillion, a plaster piece.


Later this week I hope to work on the base board itself - a piece of mounting board with some undulation provided by foamcore, with a central path leading from the gate to the crypt in one corner, and other plots for the gravestones that fg has, plus a creepy dead tree for the other corner.

Sunday, October 14, 2012

Armed and not too dangerous

While I wait for the 15mm figures from Martin, I painted up some armed peasant, a project inspired by Matt.


The three command figures are Perry plastics, the men Crusader Miniatures 'Peasants and Pilgrims' pack, and the women and children I frankly can't remember now. I bought them mainly to use them in Strandhogg skirmishes, but with the addition of a leader, standard and musician, you can convert almost any 20mm square-based group of figures into a Warhammer unit. In this case I can use them as an Empire Free Company unit.

Inspired by Matt, I too decided to convert a few of the figures to make them look more varied - you get 2 of each pose in the Crusader pack. The first guy on the left was given a wooden shield from the Perry sprue, and the second guy had his sword replaced by a length of toothpick. I think he is the toughest guy in the bunch because who else would go into battle with just a stout stick?

The fourth guy had his axe converted into a flail using the end of a morning star handle and two links of chain from a GW beastmen sprue - rather than to use a real chain, I decided a rigid length of plastic chain was easier to work with.

The last guy had his spearhead swapped for a polearm head from a Perry sprue. I don't think there is a farm implement that looks like that, but it seems to work.


All the figures were spray-primed red-brown and then painted in earth tones. I chose a (very) limited palette to give them a sense of cohesion.


I think this is one group of figures I wouldn't mind adding to. Now when does Foundry have its sale?

Monday, October 01, 2012

Character-Building

With my Space Marines completed and the Attalid Pergamenes yet to arrive, I have a time slot between projects that is too short for me to start on any of my outstanding ones (several one-dozen 28mm figures jobs lined up), yet I do not want to stop painting for fear of losing momentum.

What do you do in times like this? You build characters.


The beastman is a Resina Planet Khaos Gor. After looking at a few options, I decided to add some putty onto his legs to disguise that fact that he has scrawny ones. Then for good measure I threw in a piece of driftwood I found on the beach at Foca (of the Phokians fame) in front of them, stained with Devlan Mud.


The female dwarf is from Scibor, a gift from fg. Her shield is unfortunately miscasted, but let's just call it battle-damage. I replaced her rather cartoony sword with a mace from a Perry WOTR box. I think I will call her Mathilde.


These two characters will join my small beastmen warband and my rather bigger dwarf hold.

Sunday, September 30, 2012

St Teilo's Church

A while back I traded some figures with Matt. Since I didn't want any of the figures he had on hand, I took him up on an offer of a scratch-built building.

After browsing through the pictures of some historical buildings he took on his blog, I asked for a church building based on St Teilo's Church, pictures of which I have posted below:


We decided on a single-hall structure, and Matt went off to work...

Two months later, I picked up the church from the local post office, and what I saw was simply stunning. I'll let the photos do most of the talking. I've posed it inside a walled enclosure I bought off ebay and the trees I recently bought.

A wounded knight seeks sanctuary at a church

The gate swings open, and he is greeted by the friar and a lay follower of the church

The porch is removable. Note also the Celtic Cross made by Matt

The door swings open...

Matt has recreated the interior of the church too!

"Lie down upon this table and rest, my good sir."

The bell in the belfry actually swings!

I don't think anyone could have made a better trade than this one. :)

Added: Matt's post on this building here.

Saturday, September 29, 2012

Class Photo

It took about twenty years, but here they are now.


All 2000 points of them, and every one of them painted by myself.

There are the women of the scout squad, the three tactical squads with flamer/meltagun and heavy weapon, and sergeants with melee weapons, the assault squad accompanied by the chaplain, the terminator squad with flamer and assault cannon, the Thunderfire Cannon with Techmarine, the dreadnought, and the command squad with the Captain, standard bearer, apothecary, champion, sergeant, and veteran.

The core of this force started almost twenty years ago with just 15 figures in three squads which I meant vaguely for some sci-fi skirmish game. When Thomas and Adrian started painting their 40K armies last year, I decided to refurbish my force and well, one unit led to another and pretty soon I was gunning for a full 2000 point army, thanks to fg who supplied me with many of the figures.

It's perhaps a testament to GW's staying power that one can still easily buy figures for a line that is in fact 25 years old.

Now to take a break and get ready for my 15mm Attalid Pergamenes and perhaps finally learn the Impetus rules...

Added: The army by daylight.

Tuesday, September 25, 2012

The luck of the Irish, or the Emperor's foreign regiments

After I received the Vistula Legion, I noted that I had room for just four more bases of infantry in the box I use to store my Napoleonic infantry. I toyed with the idea of getting four bases of Italian infantry to bolster my foreign regiment presence...

Then while looking for flocking materials on Sunday I uncovered the 15mm Napoleonic figures I painted years ago when we were doing Republique - all three units of infantry took part in the Battle of Fuentes d'Onoro. I soaked the bases in water, plucked the figures off, and then re-glued them four-to-a-base and I have four bases of infantry and one of cavalry. A lick of paint similar to that used by the ebay seller (Medium Flesh - go figure), some flocking, and they are ready.

So here they are, the Polish (infantry bought painted, now with their own colours), the Regiment Irlandais, the Legion du Midi, and the Legion Hanoverienne.


Welcome back to the fold, boys. Now let's go bash some Brits and Austrians!

Monday, September 24, 2012

Tehnolog Walls

The Tehnolog cannon and orcs came with two ruined walls and connecting corners which are modular in that they allow more walls to be added.

I glued the walls to a piece of mounting board with the sides sealed by masking tape (this is a really important step, I think), and then added a floor made from another piece of mounting board in the inside. I chopped up the sprue and added some bits of plasticard and dowels and glued them to the base as rubble, followed by a scatter of gravel and then sand.

Once everything is dry, I sprayed the whole thing black.

The plan was to spray the black-coated model with my can of grey primer afterwards and then give the whole thing a wash. However, due to its age the grey primer came out of the nozzle a little gooey, and gave a textured paint effect, which was not unpleasing.


When the spray paint is dry to the touch, I painted the steel windows and exposed steel beams in black again and then steel. Finally, I gave the steel structures a wash of Devlan Mud, allowing the excess to pool and stain the surrounding concrete, and then give the rest of the structure a thin wash of Badab Black.


I really like the heft of these walls, and of course the cannon is a delight. Perhaps I should get another box, this time with different figures; at 54mm, they are not really what I need, but I suppose I can always use them as statues.

Sunday, September 23, 2012

Rolling Thunder

"Cannon, see that Eldar Farseer there? F**k him and everyone near him"
With no game this weekend, I managed to get some of the toys I received this week painted.

First up is the "counts as" Thunderfire Cannon, with a Devastator sergeant posing as a Techmarine. I chose to give him the hand-held device in one hand, and a powerfist in the other since Techmarines have servo-arms which give them close-combat bonus, and because the arm looks cool, especially when pointing. The kneeling pose is also very "gunner", which adds to the whole look.


I didn't have any specific shoulder insignia decal for him, so I superimposed a skull - the symbol of my boys - on a red sunburst pattern that came in the Dark Angels Devastator decal sheet, on the basis that it looks sort of like gears.

For the cannon itself I decided to pattern it after WW1 field guns - all painted in one colour. Most of the pictures I found on google are either black-and-white (duh!), and the colour ones are mostly museum pieces or abandoned guns in advanced stages of decay. I thought about weathering the gun to show chips and rust, but then I decided that as Marines, they would probably take better care of their equipment - after all, we are not orks. So I sprayed the whole thing green, painted in some of the missed spots, then washed it liberally with Badab Black, allowing pooling specially in the spokes of the wheels. Some "beading" occurred on some areas, which gave the appearance of oxidation. A brush of medium green highlighted the edges, and some black on the muzzle suggested soot.

The wheels appeared to be single pieces of metal with no separate tyres, so I drybrushed grey on the area that would contact the ground, and then silver to suggest bare metal showing through worn off paint. Since my marines are based on rocky rather than muddy ground, I did not add any mud stains.

The finished model looks plain; unfortunately there are no flat areas to apply the chapter symbol and there is a stark absence of skulls - not like my boys at all...


All in all I am pleased with the model. I am now working on the walls that came in the box too. If Rick does decide to build an Imperial Guard army based on Warzone figures, a few of these wouldn't be amiss.