Tuesday, February 27, 2018

Tehnolog Orc painted as Magnamund Ogron


This is one of the four Tehnolog 54mm orcs that I got quite a while back. I reckoned they area good size for ogres next to 28mm scale figures, but I don't have an army that had ogres, so they remained unpainted. Then one of the adventures in my Lone Wolf campaign took my players to the Stornlands, where the Magnamund version of ogre - the ogron - commonly serve as mercenary troops.

The ogron is described as being around 9-foot tall, and have blue skin. The inspiration for the colour scheme comes from the ogron as depicted on the cover of the Magnamund Bestiary, and also an illustration of the same ogron inisde.


I tried a new technique on the shoulder plates to duplicate the appearance of worn metal shown in the illustration, and was quite happy with the result.


You can see all the four orc figures that came in the Tehnolog box in the picture below, and you can easily find a seller for them on ebay.


They can each fit onto a 40mm square base if you angle their front a little, but it will take some planning to make them rank up if you plan to put the bases side-by-side in a unit.

The final photo shows a size comparison against a Reaper 28mm figure.


Monday, February 19, 2018

Wargames Factory Woodland Indians with Mad Robot Miniatures conversion bits


Here are the three Wargames Factory Woodland Indians figures with weapon arms from Mad Robot Miniatures I painted last weekend.

As you can see, the arms are a little large for the torsos - and this is even after I have shaved them down considerably, but I think over all they still look ok for the tabletop.


They are based on the same Mirco Art Studios resin bases I used for the rest of the gang - this resulted in some odd poses, but as fg and I plan to use them for Necromunda, which features a lot of elevation, this may work out afetr all.


The final photo shows them alongside the rest of the gang. Their heads are noticeably smaller than those of the metal figures, but their futuristic-looking weapons help them blend into the look.

Saturday, February 17, 2018

Mad Robot Miniatures Heavy Weapon Team Done


I managed to complete the Mad Robot Miniatures Heavy Weapon Team over the past few days. The miniatures are from Mad Robot Miniatures, and the mortar, sandbag, shovel, and the mortar bomb in the hands of the crewman are from GW 40K.


The figures were fun to paint - and there is simply something about heavy weapon teams that just says "Imperial Guards".


The final photo shows the mortar team alongside the Warzone trenchers. Nothing on the figures from the two ranges themselves is exactly identical, but I think the identical colour scheme ties them together.

I am now tempted to buy figures and bits to build a squad of Rough Riders modeled after WW1 British cavalry, but the cost is likely to run to US$100 for six mounted figures. Perhaps I will wait for a sale...

Saturday, February 10, 2018

Mad Robot Miniatures Heavy Weapon Team


I've been looking for a mortar team for my Warzone Imperials force for a while, but I haven't been able to find something that will match the look without some expensive and laborious head swap.

Then while looking for arms (as in upper limbs) and weapons to go with the Wargames Factory Woodland Indians to convert them into post-apocalyptic gangers (more on that in another post), I found Mad Robot Miniatures, which had the arms I needed, and indeed a whole customisable sci-fi miniatures range. I decided to get a 3-man crew since I was paying all that postage anyway, and the result is what you see above.

They unfortunately do not have a mortar, so I had to find and buy a 40K Imperial Guard mortar from ebay (and since I was paying postage I bought some other bits too, including the sandbags you see on the base).

The uniforms are not an exact match to the Warzone trenchers, as you can see below, but maybe infantrymen had a different uniform from men from the support company. Maybe.


The final picture shows how well the mortar bomb from 40K fits into the hands of the Mad Robot crewman. Over all, I am quite happy with my buy.


Saturday, February 03, 2018

War & Empire III Kickstarter


West Wind Productions has just started their kickstarter for their range of 15mm figures, and it funded in just 41 minutes.

I have bought a couple packs of their Successor infantry and cavalry, and liked them enough, so when I found that they will be releasing Late Romans this time round, I decided to back the project and give our Roman-Sassanid project another boost.

I am backing the King level together with Martin (who is looking to get a couple packs of Palmyrans), which will give me enough figures for three double-units of spears supported by archers, and two units of javelin-armed auxilia. That's 144 figurines to paint, not counting the free figures that will come with the stretch goals.

If you are looking for a new project for next year - the shipping date is given as December 2018 - then you may want to head over and have a look.

Sunday, January 07, 2018

em4 Future Skirmish Savages and Micro Art Studio bases


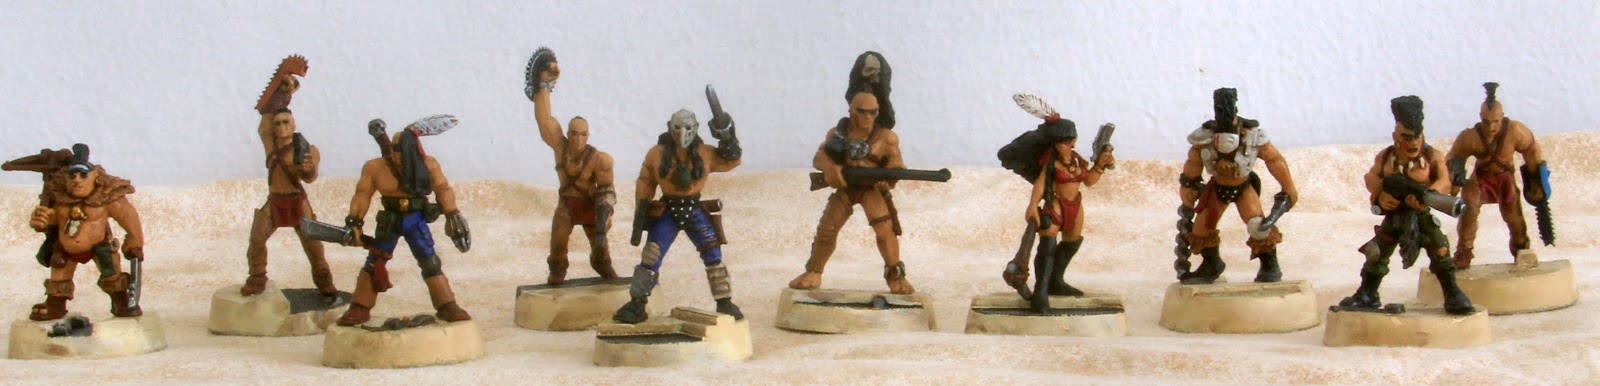
Here are the seven em4 Miniatures Future Skirmish "Savages" figures I painted over the past couple of weeks. They were passed to me by fg (along with several other post-apocalyptic type figures) when I asked if he had any figures suitable for the short Gamma World RPG campaign I had planned. As usual, he had many. I went through his box of figures and picked out seven I liked, and as it turned out they all came from the same range. Despite their age, these sculpts are still some of the best I have seen.

I painted them as a gang with some sort of a Native American theme, dressed in ripped jeans or military surplus, and using red as a gang colour, either in the form of a red bandana tied somewhere on their persons, or as face paint.

Other than serving as the bad guys for my Gamma World campaign, they may also form the core of a Necromunda gang. Fg has bought the new Necromunda box set, so as soon as he has a gang painted and we have learned the rules, we should be ready to start a campaign.


Other than the figures themselves, one of the things that I was rather excited about were the Mirco Art Studios "corregidor" bases I bought for the figures. As you can see from the photo above, they are an interesting match for the Battle Systems Shanty Town buildings I bought. Sure, the hatching on the metal plates are different, but it would have been too much to ask for for them to be an exact match.

You can't really tell from the photo (I certainly couldn't when looking at the photos when shopping for them) the bases are more 3D than they look, as in there is a "drop" of around 2mm between the "floor" part of the base and the "grille" part of the base, which can present a bit of a problem when basing "slotta" figures, which have both feet at the same level.

Now seven figures may not be enough for a Necromunda gang, at least not if I expect it to expand, so if you know of any Native American-themed futuristic/post-apocalyptic figures, so let me know in the comments.

Thanks!

Monday, January 01, 2018

2017 in Review and Looking Ahead

2017 was a poor year for wargaming - we only met for a total of seven sessions. During the same year, I played in at least 28 sessions of RPG, which included a 10-session campaign, two two-session old school dungeon crawls, and GMing two convention games.

Things may yet pick up in 2018 though. Martin has hosted our first naval game at his place, and I certainly hope to redeem myself after our poor debut performance. Meanwhile, I hope to get a few Franco-Prussian War games played at my place.

But the value of the sessions lies not in gaming alone; I have known Martin, fg and wahj for more than a decade (I have been friends with wahj for more than two-thirds of my life, actually), and our gaming sessions are more about talking about old times, life, and everything under the sun than the games themselves, really.

By contrast I have known the players in my RPG group (excepting fg) for less than two years, and most of them I have met only since April last year; while a common hobby can kickstart friendships, it will still take time.

For most of the year we played through the Savage Worlds space opera campaign, which I enjoyed tremendously. So much so that I ran the first scenario from that campaign as convention game twice. I may in fact continue to use scenarios from that campaign for convention games this year.

The monthly mini-convention is likely to be a regular thing, but the venue is rather far from my home, and as I utilise a lot of terrain boards, figurines, and models for my games, traveling to and fro can be quite a strain. I still want to do that though, mainly as a way of giving back to the hobby and bringing newbies into the hobby, perhaps quarterly?

I did manage to start a Lone Wolf campaign as I planned. The campaign is scheduled to run until the end of March, after which a three-session Gamma World campaign is planned for April. From June I plan to run a new long campaign (around 12 sessions or so); I have not decided on the setting or the rules yet, but there are a few potential candidates lined up.

There is a synergy between wargaming and RPGs, of course, and one example of this may be the seven 'gangers' figures I hope to paint up over the next few weeks: these will serve as the main antagonists for my players in the Gamma World mini-campaign (where they will be the evil Pure Strain Humans who want to wipe out the player characters, who/which are all mutated humans, mutated animals, or mutated plants), and perhaps as the start of a Necromunda gang.

Experience has taught me not to put too much faith in my own predictions, but what's the hobby without ambitious plans?

Have a good year ahead.

Sunday, December 31, 2017

Wednesday, December 20, 2017

Small Scale Woods Terrain Tutorial


As promised, here is a tutorial of how I made the woods terrain pieces for the FPW game. The idea is not original, of course, but I hope it will help gamers who are looking for a step-by-step tutorial.

There are three parts to the terrain piece: the trunks, the canopy, and the foliage.

For canopy I chose to go the easy way and got a pack of Woodland Scenics tree armatures, which are of course expensive but become more affordable if you buy the bulk pack that is not pre-assembled with foliage glued on. It has the advantage of being brown to begin with, and having ready-made bases.


I made the mistake of buying armatures that are too all for mt needs. When cut off at the height I wanted (about an inch) there are not many branches showing. I compensated by gluing the upper part of the armature to the base instead.


For the canopy I used black mounting board. It is important to use black (or at least a dark coloured) mounting board as the coverage with the foliage will not be complete, and any white or light colour, including those on the edge of the mounting board, will show through if not covered.

I cut our various roughly oval or round shapes.


Using hot glue, I then glued the trunks to the bottom of the canopy. I figured I need around eight trunks for a large-sized piece to look convincing. Note the black edge of the card.


Then comes the foliage. Again, I turned to Woodland Scenics. You want the Foliage Clusters and not the looser types of clump foliage. These are denser and can be applied in large pieces, making the next step much easier. I used two colours to give a more natural look.


Using hot glue, I glued patches of the foliage to the top of the canopy piece, making sure that I cover the edges of the piece too.


And here is the finished product, with a base of 10mm Prussian infantry posing next to it.

At this scale the terrain will work with 6mm, 10mm, 15mm, and at a stretch even 20mm.

I hope to post a tutorial on how I made islands for the WW2 Pacific theatre naval project Martin has started. Stay tuned!

Monday, December 18, 2017

WWII naval action off Guadalcanal

On Sunday I hosted a game for FG, Wahj and Arjun where we did a WWII naval scenario off Cape Esperance, Guadalcanal and I now have the pleasure of providing my first contribution to this blog. We used Victory at Sea rules with it's scenario with some slight amendments in the form of a slightly reduced US fleet size but which still outnumbered the Japanese. I had always been enthralled with GHQ's 1/2400 naval miniatures and had always wanted to field a game with them so this game was some time in planning. This was also a good opportunity to see how the rules played out.

This scenario is of both US and Japanese fleets consisting a mix of cruisers and destroyers  setting out to clear opposing forces off Cape Esperance at Guadalcanal with Wahj and FG commanding the Japanese forces and Arjun and myself, the US. The Japanese fleet started in the south easterly heading (bottom of picture) with the US heading in a westerly heading. 


The opposing fleet on a collision course with destiny (looking  east)


Lead elements of the Japanese fleet: Kagero class destroyer (front) and a Furutaka class cruiser (back) passing some rain squalls.  


Lead elements of the US fleet with a New Orleans class cruiser in the lead.

With the Japanese team winning the initiative, they opted to diverge their fleet into two separate flanks, turning port and starboard outwards, which was followed on by the US commanders in multi-turn moves between both forces. No one wanted to be caught at full beam between two enemy ships!


The opposing fleets diverge to the flanks (looking west).

 
The fleet maneuvers consisted of Arjun performing a dicey slice through maneuver, perhaps in an attempt to awe the Japanese with his brilliant seamanship. I attempted to bring up the rear elements by ordering full flank speed to narrow the distance and bring the guns into range. 
 

The "hard to achieve" slice through manoeuvre they don't teach you at the Naval Academy.

The Japanese however were not having any of it. With them gaining the initiative again, they opted to teach the American dogs a lesson with an opening salvo. 

The smoke screen
  
A lead Kagero class destroyer on the port (left) flank commanded by Wahj also created smoke as part of a special action to screen her accompanying vessel. The engagement ensued into a slugfest with both forces trading surface volleys that at best, created some token damage and at worst, caused a thorough drenching of a few chagrinned sailors sun tanning on deck.


The Japanese then turned the tide when FG and Wahj brought their superior torpedoes into play. With their high attack and damage dice numbers they soon made short work of two US cruisers which were sunk in quick succession only for the loss of one Japanese destroyer which honourably gave its life for providing screening protection.


With the lost of the two cruisers, the US commanders, after concluding that the loss of a third cruiser was unacceptable and that Cape Esperance was not sufficiently safe anymore, beat a hasty retreat to the South East. It was unanimously agreed that the Marines on the island's air strip had the right stuff to endure yet another day of Japanese naval bombardment (Marines! You Can Do It!). An after action report discussion yielded a couple of observations.
 
1. The US fleet was not using the destroyers effectively as a screening force.
 
2. The US fleet did not perform any evasive actions allowed under the movement phase to mitigate the torpedo risk.
 
3. The US destroyers could have used smoke to effectively screen the cruisers.
 
4. The US destroyers should have utilised its "agile" special trait to maneuver close enough for a torpedo shot. In hindsight since this was a one shot weapon, we were probably waiting for the right moment. 
 
5. The US fleet despite its slight numerical advantage were outgunned at close range.
 
6. I will probably end up making some appropriate torpedo markers 
 
Nevertheless this first run was enough to give me some familiarity of the gameplay and will add to my understanding when I go through the rules again.  With the conclusion of the tabletop hostilities, the opposing commanders adjourned to the sitting room to continue with our beer and to discuss various topics such as the World of Warships online game, our fitness and dietary regimes, Aamir Khan, Ryan Gosling as Young Hercules, "You messed with the wrong guy" genre movies and how to avoid corporate tax by declaring your company as a charitable organisation.


Saturday, December 09, 2017

10mm Franco-Prussian War terrain


While I haven't do doing much wargaming this past year, I have been making purchases and making terrain for wargaming. What you see in the photo above is the result.

The playing surface is a 6' x 4' mat from Deep Cut Studios, with 15cm grids. I chose this primarily to use with the To The Last Gaiter Button rules, but also with the hope of finding a set of grid-based Napoleonic rules to use - if you have any suggestion, do let me know in the comments!

The woods are made using Woodland Scenics tree trunks and clump foliage, hot glued to black mounting board. I will post a tutorial on how I made these another day.

The village/town pieces are made using the buildings from Perry Miniatures' Travel Battle game, which are sold separately in sprues - they are closer to 6mm in scale, but look effective with 10mm figurines too. They are based on pre-textured paper, again from Woodland Scenics, which was glued to plasti-cards for sturdiness.

The swamps are just green transparencies cut into irregular shapes, with tufts applied.

Elevation is created by placing books under the mat.

Last but not least, the figurines were previously unceremoniously dumped into tins after our campaign several years back - I magnetised their bases and organised them into tins according to nationality and type.

We are ready for some FPW games.

A closer view, showing the comparative scales of the figurines and the buildings.

A low-angle view, showing the ridge created by books.

A closer view of a swamp terrain piece. I like how the 'grass' is darker nearer its bottom.

I need a lot of woods terrain pieces, I think; but while I was making more just now I cut my finger badly, which means no more handicraft for the weekend.

The fact that books have to be placed under the mat to create elevation means that the table cannot be set up in advance - in TTLGB the players spend points to place terrain as part of the game, which means less playing time. To overcome this I think I will instead play through the scenarios provided in the 1870 Grand Tactical Rules book.

The FPW was one of the 'bucket list' periods I just had to play, and I spent quite a bit to have them painted, so I am pretty happy that the new products on the market (the gridded mats from Deep Cut Studios, presumably created for To the Strongest!, and the Perry Travel Battle buildings created just for their game) made it easier for me to revisit the period with better-looking terrain.

Now I can only hope that Plastic Soldier Company release some Arabs and Turks under their Great War system so I can do my other bucket list period: The Arab Revolt...