Showing posts with label WW2. Show all posts
Showing posts with label WW2. Show all posts
Friday, September 18, 2026

Saturday, December 21, 2024
Games Expo 2024

After making contact with another wargaming group during a convention in October, we were invited to put up a game for their own convention in December. Martin and I decided to attend and reprise the Indian Mutiny game FG and I ran in the previous convention, since we already had the scenario and charts ready.
Once again we managed to run two sessions, and although the British came closer than ever to winning, victory continues to elude them!
The convention featured other games, including an A Song of Ice & Fire tournament, many boardgames, and a few RPGs, but the centre-piece of the convention was a giant Bolt Action Bastogne game which ran for some eight hours.
Martin and I made more new friends, and no doubt more gaming will come from these meetings.
Sunday, December 03, 2023
Grid-based Napoleonics and Undaunted: Battle of Britain

For our November session we managed to get five players for another grid-based Napoleonic Game.
We played the action of the Austrian left flank at the Battle of Sacile.
FG, Adrian, and I, playing the Franco-Italian force, slogged through the forests and marshes surrounding the Austrian-held towns of Palse and Porcia instead of approaching them in the open; as a result our attacks went in piecemeal, and the Austrians were able to hold on to Porcia by the time the clock ran down, winning the game.
After the main game Adrian took us through a game of Undaunted: Battle of Britain.

I thought the flow of the game didn't really resemble aerial dogfighting, but it did give me an appreciation of the Undaunted game mechanics, and make me want to give the original Undaunted game a try.
For our December game we are planning a game of the second edition of Conquerors & Kings, so stay tuned.
Monday, October 23, 2023
Arrowstorm and FiveCore Company Command (ft. Undaunted: Normandy)

I am actually two AARs behind on our Savage Gamma World campaign, but since it is faster to wrote a wargaming AAR than an RPG AAR...
We were planning to play another Napoleonic game on Sunday, but due to unforeseen circumstances only Fg and myself were able to meet up for the session, so we decided to instead play something I have been planning for for a while, and something that just came up recently.
The first game we played was Arrowstorm, a recent release by Dan Mersey. I was actually a playtester for the game in its previous incarnation many years ago, so I was excited to get a copy of the rules when they were released this month. The rules cover the period from the Norman Conquest to the Hundred Years War, and I was hoping to use them for Wars of the Roses too, but given that this was October, I decided to take my Dark Ages collection out and fight the Battle of Hastings.
The rules utilise a tile system, which allows me to use my Undaunted: Normandy tiles. They are a tight squeeze with the 15mm figures we used, but I like the look. In the original game players placed order token onto a shared order chart, but I thought it would be easier to just print the order chart out, glue it onto a piece of card, and cut it into counters which the players can take instead.

The game is rather, well, game-y. You take turns to choose a limited menu of orders from a common pool, which you can then use during the upcoming turn. However, you may choose orders which your troops cannot actually execute just to deny them to your opponent - in our game I (playing the Anglo-Danish) chose the Shoot order on many turns even though I had no missile troops simply to deny them to the Normans, who had missile troops.
The game flowed well enough. In our game the Normans charged the English left flank, but then their cavalry was defeated when they charged up the hill. Fg sent his spears round the English flank, but as I held a unit in reserve they were able to hold them off until I could deploy more units from the main line.
I will see if I can make up scenarios for Wars of the Roses for these rules in the future.
For the second game we played FiveCore Company Command, a game by Nordic Weasel, but not exactly. You see, I have been looking at the Undaunted: Normandy tiles for a while, hoping to use them with miniatures. They are unfortunately a little small, being only 9cm x 9cm, and while they are printed on both sides, there are only 18 tiles in a box, and I had to wait until Amazon Prime Day to order a second set to have enough tiles for our games.
Anyway, back to rules.
Our group were playing the Chain of Command rules several years ago, and have between us accumulated four 20mm armies. While we enjoyed the period, the CoC rules were not the easiest to play or remember. After trying out a few of the other Nordic Weasel games, I decided to give FiveCore Company Command a try, and thought that its depicted my idea of WW2 combat well enough. With some tweaking, I converted the rules to being grid-based, using a rough conversion of 1 grid = 6".

As you can see from the photo above, the tiles are even more crowded when using 20mm figures, and all the more so when vehicles are used. But the grid format made the game easy to play.
We played a scenario from a Chain of Command Pint-sized Campaign book, twice - the first time with just infantry, and the second time with a Sherman on the US side and an anti-tank gun on the German side. The Germans won the first game, and the US the second game. In both games the victory came after one side suppressed the other side and made a dash to/from the church on the upper side of the map across the open ground (tile 12B). The tank and the anti-tank gun we used in the second game did not actually end up having much influence on the outcome.
I enjoyed the games a lot, but the small size of the tiles was an issue for me. After the game I explored the options of recreating larger versions of the tiles, or even making similar larger tiles using the RPG maps I have been using, but there was no perfect solution. I think we will probably stick with the Undaunted tiles for now, and hope that they produce a deluxe edition with larger tiles someday.
Thursday, June 15, 2017
July Giveaway
For the month of July, I am giving away several sprues of WW2 German infantry which I don't think I will ever get around to painting.
They are as follows:
Once again, if you want these items, do leave a comment, and I will draw a recipient on 01 July. This is not a first-come, first-serve offer.
The offer is free: once I let you know you have been drawn, do let me have your email and mailing address and I will send them off to you. You don't even have to pay for postage; I am hoping to give these figures a good hope.
Good luck!
Added: Also, would Michael Mills contact me on this blog so I can send you last month's giveaway please? Thank you.
They are as follows:
 |
| Pegasus Hobbies German Fallschirmjaegers. |
 |
| Leftover figures from Plastic Soldier Late War German Infantry |
 |
| Plastic Soldier Company Self-propelled Gun Crew, and some soft plastic figures and equipment from the Pegasus Hobbies IG18 set |
Once again, if you want these items, do leave a comment, and I will draw a recipient on 01 July. This is not a first-come, first-serve offer.
The offer is free: once I let you know you have been drawn, do let me have your email and mailing address and I will send them off to you. You don't even have to pay for postage; I am hoping to give these figures a good hope.
Good luck!
Added: Also, would Michael Mills contact me on this blog so I can send you last month's giveaway please? Thank you.
Sunday, June 26, 2016
Chain of Command: Kampfgruppe von Luck Game 2, The Grizzled, and Three Cheers for Master
 |
| Panzergrenadiers making their tentative way through an orchard. |
Martin and I played Game 2 of our CoC campaign this afternoon. The scenario required my Germans to cross the table dominated by a cluster of walled buildings on one end, and couple of hedge-enclosed areas. I did pretty well in the patrol phase, managing to secure a Jump-Off Point in the middle of the table.
 |
| The scenario called for a lot of vegetation... Those are all the trees I own. |

I sent another section up the other fork of the road and pushed into the woods. This section was then engaged by another section Martin deployed in response.
At this point I must state that Martin rolled incredibly well, managing to rack up three chain of command dice to my one, rolling several phases in succession, including four sixes and a random event that forced me to deploy another one of my squads before I intended, causing them to be exposed to enemy fire.
With my squads under fire (and one of them broken) I sent in my secret weapon: a Grille M proxying a Lorraine Schlepper (f). The big gun forced the Vickers in the attic to withdraw, whereupon I decided to push my luck: I sent the section on the left running towards the table edge, while the Grille put pedal to the metal and rolled down the road.

Martin quickly redeployed his Vickers and stopped my squad on the left, and with one of his (many) chain of command dice ambushed by Grille as it raced forward.

With my momentum lost and Force Morale low, I called a retreat.
Fg, wahj, Martin and I then played a couple of boardgames.
The first was The Grizzled, a WW1 themed co-operative card game where players take runs playing cards that represent either group adversity or personal psychological trauma. The aim of the game is to play through the deck and not accumulate too many of one kind of adversity during each round (whereupon the game is lost) - if you survive till the end of the deck, you have survived the war.

I generally do not like co-operative games, and this is no exception. The theme is pretty dark, and we felt that it can probably be re-themed to depict bomber crews during WW2 or infantrymen during Vietnam.
The next game we tried was Three Cheers for Master. This is a competitive tower-building/climbing game where foreminions make minions stack themselves atop each other so they can form the most impressive cheer-leading tower for the master.

I am not quite sure we got all the rules right, but the game looks like it has a lot of potential for strategic play. I would liken it to a game of Robo Rally where the cards you play stay relevant until the game's end. I would certainly like to give this game another try.
Sunday, May 22, 2016
Chain of Command: Old Hickory Games 1 and 2
 |
| fg's GIs make their debut |
I currently playing two of TFL's Normandy campaigns concurrently: Kampfgruppe von Luck versus Martin's British Paras, and Old Hickory versus fg's US.
For the first scenario I decided to attack along the rail line, hoping to use my superiority in support points to quickly roll over the US defences. Fg set up a minefield before his Jump-Off Point on the ridge, and a wire obstacle in front of the fence guarding the approach from the north.
To develop the enemy, I sent one section moving tactically along the road towards the railway station, while another was sent on my right flank to try to put pressure on the gun position on the high ground overlooking my approach.
 |
| The opening moves |
 |
| My Panther also debuts! |
Game 1 was a crushing defeat for the Germans.

With still a lot of time left, we decided to proceed to Game 2. FG did some redeployment, but I decided to come down the same road again, hoping that he had shifted some of his forces away.
This time round I decided to go the anti-infantry approach and took an FO, an MMG, *plus* an infantry gun - surely this time I will triumph?
My FO called down a barrage on the station, and my infantry gun put down effective fire on the American gun position on the ridge, but was unable to cause any significant casualty due to their prepared position.
 |
| A glorious start to the battle as the mortar barrage lands on target! |
The open approach proved to be difficult. For the next game I will have to considered a more concealed approach, which will no doubt be slower.
Sunday, May 15, 2016
Chain of Command: Kampfgruppe von Luck Game 1

After a long hiatus (almost five months), we got back into Chain of Command by playing the first game of the Kampfgruppe von Luck campaign.
The first scenario is pretty straightforward, and features a German advance along a road to probe at the British perimeter. Martin rolled well for his "dispersal" and turned up with almost his entire platoon, and the patrol phase went well enough for him so the British managed to set themselves up behind a hedge.
Fg, commanding the Germans, deployed his leading section close to the British position, and then promptly called down a mortar barrage... that deviated and caught both the British and Germans under the impact area. If you look at the boundary of the impact area as indicated by the white smoke tokens in the photo below, you can see that the platoon commander and the Forward Observer team (on the top right corner) are just outside it.

After two phases the British have had enough and decided to pull out; fortunately for them they were close to their Jump Off point and could do so without excessive penalty. The Paras are now understandably upset but not yet demoralised, while the Germans are feeling quite optimistic. However, the next scenario will see the Paras fighting from better defensive positions...
Monday, April 25, 2016
PSC SdKfz 251/10 and Roden SdKfz 234/1
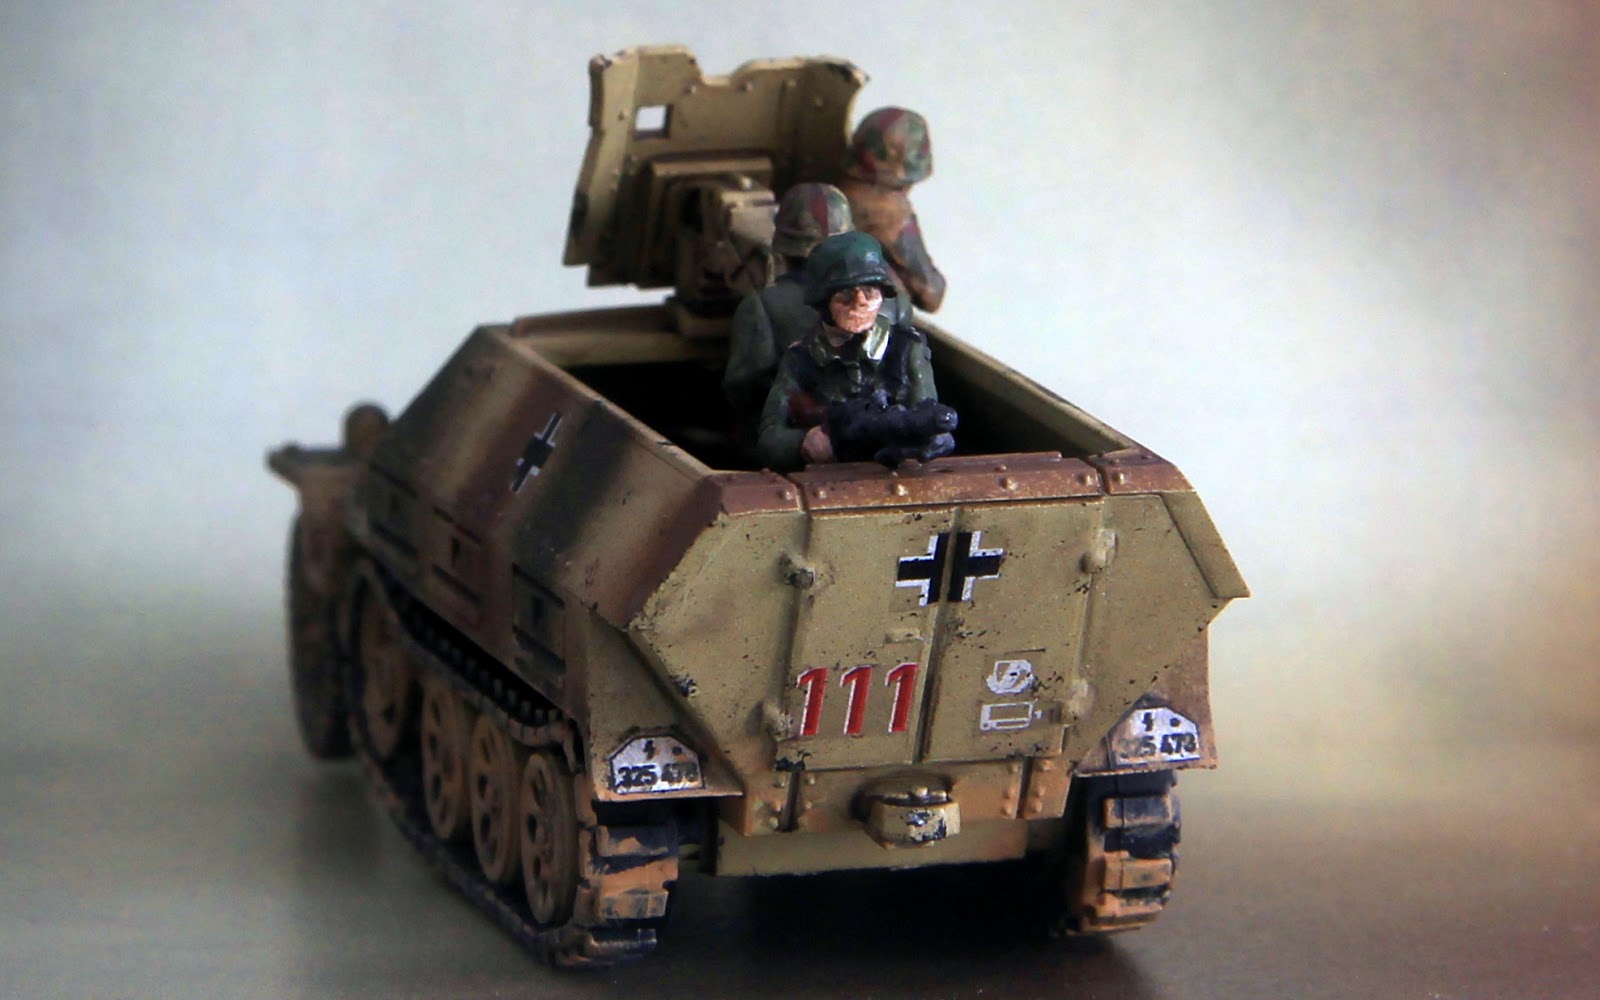
I pray-painted the camouflage on these two models along with the two SPGs in January this year, but have only just gotten around to doing the weathering and crew for them.
The first is a Plastic Soldier Company SdKfz 251/10. The loader figures comes from PSC, while the figures with the SMG and MG are from AB Figures. The decals are from Peddinghaus,
The kit was a quick and easy build. The crew compartment is rather cramped, and even though I have several other crew figures, I couldn't find a way to fit them all into the vehicle.


The second vehicle is the Roden SdKfz 234/1.
I chose this one after reading a few reviews of the kits available out there, partly because I was intrigued by the fact that the anti-grenade screen is made with a sheet of mesh which came inside the kit.
As it turned out this is more of a modeler's kit than a wargamer's kit. The mesh wasn't easy to use. The turret MG and 20mm gun are fully detailed, as is the internal compartment. The wheels were a nightmare to assemble and fit onto the chassis, as they are made with a softer, more flexible material, presumably to allow the modeler to model the vehicle on undulating ground, which will show off the individual suspension of the vehicle. In my case what it ended up as was saggy wheels, which fortunately is not very obvious at tabletop distance and point of view.


With these models done I am temporarily out of WW2 vehicles to assemble or paint. I am waiting for PSC to release their German trucks in 1/72, whereupon I will purchase a box along with their RSO tractor.
Monday, April 11, 2016
Elhiem Miniatures Red Army Scouts

I still have to paint the shields and glue them onto my Iron Wind Metals Chaos warriors, but in the mean time I decided to paint up the Elhiem Red Army Scouts I bought a while back.
As you can see from the photo above, some of the figures look better than others, but over all they are nice figures that fill a niche.

They blend well enough with the Zvevda figures I already painted. Here they make up a Soviet Scout Squad under the Chain of Command rules: a sergeant, and two teams each with two men with rifles and two with SMGs.
I think the Scout rules offer an interesting tactical option for the Soviet player, and I hope to borrow wahj's Soviet platoon for a game against my own Germans soon.
Sunday, January 24, 2016
UM Grille M and MMS Marder III M

I finished two models today - both open-topped self-propelled guns based on the 38(t) chassis. OK, I still need to paint up some crew figures, but the vehicles themselves are done.
The first is a UM Grille M. It's a pretty detailed kit and comes with etched brass part, including the fold-into toolbox you can see on the left side of the hull. I left a lot of details out as the crew compartment is really cramped and I won't be able to fit any crew figures in if I put the ammunition in.
It was a difficult model to build as the track-and-wheels assembly is not separate from the upper hull, which is usually the case in AFV models. This meant I could not paint the wheel separately, or assemble the tracks with ease. The link-and-length was a struggle to put together, and as you can see I botched it up.


The second model is an MMS Marder III M which Martin passed to me. This was also a difficult model to build as the instructions were unclear. The wheels-and-tracks pieces were also poorly cast and the spaces between the rear running wheels and roadwheels were filled with metal which I could not remove without risking destroying the whole pieces, so I just hid it with extra mud.

Again, the crew compartment is small and I left the ammunition out.

I bought the Grille model as a proxy for a 15cm sFH auf Lorraine Schlepper for the "Kampfgruppe von Luck" campaign Martin and I are planning to play this year - it mounted the same gun and was made from a "captured" chassis, which pretty much describes the Grille. The Marder would proxy for a Pak 40 auf S 307 (f), which mounted the same gun and was also a captured chassis.
I painted both models in the same two-tone camouflage and gave them the same unit markings to reflect the fact that they are from the same unit, but the effect is somewhat ruined by the fact that while the UM model is 1/72 in scale, the MMS model is 1/76. The difference is quite obvious when the models are placed side by side.

With the vehicles done, I have pretty much all the figures and models I need to play the campaign (after the crew figures are done - but I only need to paint four of them because that's how many I can squeeze into the crew compartments). I do need something in the order of 40 actual feet of brick walls though to play the campaign, something which will take one or two full days of hard work to do. Well, no one said miniature wargaming was an easy hobby...
Monday, January 18, 2016
Italeri M-8 Greyhound, ACE Model M-5 anti-tank gun, and Valiant Miniatures 6-pounder anti-tank guns

Right, here's proof that I haven't abandoned miniature wargaming altogether.
The model is from Italeri, and can be built in the "standard" fashion, or in a "quick-build" wargamer's kit fashion - instead of fiddling with individual wheel and suspension, you glue four pieces onto the chassis.
It was overall an easy kit to build, with a very detailed 0.50 cal machinegun.


I have built the kit for fg's US army, mainly because I like the way the vehicle looks. fg will be painting up a crew figure or two for it.
I also bought, built and painted three anti-tank gun models for fg, as we are planning to play the Old Hickory campaign by TFL. This requires a maximum of four M5 75mm anti-tank gun models and two M3 57mm anti-tank guns.

The 57mm guns are from Valiant Miniatures - these came as British 6-pounders with British crew, and to convert them to US 57mm guns you simply cut off the muzzle-brake and use a different hub cap (provided in the box).
The 75mm gun was harder to come by - the only kit I could find was from ACE, a Ukrainian company. The details are not good, the plastic a little brittle, the instructions unclear; I was rather confused by the difference between what was shown on the instructions and photos of the gun I saw on google, until I realised that the kit was of the gun mounted on a rarer, older carriage.
Again, fg will be painting the crew figures for these.
Also in the assembly line are four German AFVs, which I hope to complete and post photos of soon.
Wednesday, December 23, 2015
Chain of Command: Arnhem Game 3

Martin and I played the last game in our short Arnhem campaign on Sunday. Wahj and fg also turned up to spectate, but I wanted to play the Germans myself for one important reason...
The scenario depicted the defence of the Oosterbeek perimeter. The British hold the far (east) end of the table, and the Germans must take the large building which served as their anchor on this flank.
The game started poorly for Martin as I rolled a '9' on the Support List, which meant he could not take a 6-pounder - and I knew that.
With 17 points to spend I took my secret weapon, a Forward Observer for a mortar battery, and an extra squad mounted on a half-track.
I planned to suppress Martin's forces with a mortar barrage and then send my secret weapon speeding down the road to attack the British, but the careless FO was shot and killed before he could call down the shots. I then deployed two squads of infantry to try to outshoot martin's forces, which have by now deployed in a defence line.
 |
| 'Steady, lads!' |
Frustrated by the inability to cause any significant casualty on the Paras and the smoke from their mortar, I decided to darn the torpedoes and sent my Flammpanzer down.

When it got within range, I managed to get two consecutive phases. The result was carnage.

Martin's brave PIAT troopers fired round after round at the Flammpanzer, at one point causing the driver to lose his cool and wounding the tank commander, but when both PIAT teams were killed, the Paras knew their game was up and retired.
Once again I enjoyed the game. I think it reflected how desperate the Paras' defence was, and how for the German even if the result of the whole operation was never in doubt, individual battles could still be a touch and go affair - had Martin disabled the Flammpanzer, it would have been near impossible for me to take the position without any artillery support.
This will likely be the last game of the year. We plan to play two CoC campaigns next year, but we do have some ways to go in terms of painting and terrain-making before we can kick them off.
In case I do not post again this week: have a good Christmas.
Monday, December 21, 2015
Flammpanzer B2(F)

I actually completed this model in September, but delayed posting this post as I wanted to surprise Martin during our Arnhem game.
The idea for this project came from the book "German Armoured Units at Arnhem", which Martin lent me before we started the campaign. I have always like the way the Germans made use of captured armoured vehicles, and we did not have any flamethrower units in our collection at that time, so when I saw the Flammpanzer B2(F) I decided I would try to build one.
The model is from Trumpeter and is detailed and easy to build. The only major inaccuracy was with the driver's vision port on the left, which required some cutting to make it look like the original.
The resin conversion bits came from Modelltrans, which I bought through Lonewulf Models. The conversion bits consisted of the large fuel tank at the back of the tank, the flamethrower mount which replaced the 75mm gun on the original tank/model, an extra vision port above the flamethrower, and a piece of spare track to place over the front left of the hull. Attaching the resin bits required shaving off the rivets on the areas which the bits went over, and for the extra vision port also the removal of part of the driver's vision port, but once attached there was only minimal filling of gap with some epoxy putty required.
 |
| Front view showing the flamethrower, the additional vision port, and the spare tracks from the converion kit. |
I was undecided on whether to remove the antenna on the back of the tank since some pictures showed the tank with it and some without, but eventually I decided to remove it and cover the surface over the area with an ammo box. The tracks were single lengths of rubber and I had some difficulty with them, but I suppose it was better than having to glue individual links.
For the painting I decided to go for a three-tone camouflage on a tank fielded in Holland instead of the one shown in the book, which frankly didn't look 'cool'. I also chose a different base yellow (Tamiya Light Sand instead of Dark Yellow) and green (Racing Green instead of Olive Drab) for this model as the photos of other models I saw tended to go for brighter colours. I sprayed the patterns on using a stencil of an irregular pentagon cut in a sheet of card. The green looked too bright and glossy at first, but a wash of Army Painter Dark Tone solved that problem.
Once painted I did some weathering as per my previous projects, but also heavily rusted the exhaust tubes at the back, which in this video of a surviving Char B looks like something which happened even to a well-maintained tank.
 |
| Rear view showing the fuel tank and the heavy rusting on on the exhaust pipes. |
For the decals I used the ones I had left over on the Peddinghaus Normandy Tanks sheet.
Over all I am quite pleased with how the model turned out. It performed very well against Martin's Paras yesterday (report soon, I promise) as they did not have a six-pounder with them, but I think I may have very few opportunities to field it again in a historical context..
Subscribe to:
Posts (Atom)